Today I wanted to take a look at the recently released Fractals for Sketchblock for AmigaOS4 on the AmigaOne X1000.
Fractals for Sketchblock is written Andy "Broadblues" Broad.
Sketchblock 2.6 (also written by this author) is a free download from os4depot.net. It needs a minimum of AmigaOS4.1.4 to run.
The Fractals for Sketchblock addition costs GBP5 to purchase, which is great value considering the underlying Sketchblock graphics program is free.
You can purchase the Fractals for Sketchblock program using PayPal from http://www.broad.ology.org.uk/amiga/sketchblock/fractals/
Once purchased you will receive an individual login to download the Fractals for Sketchblock software.
Fractals for Sketchblock allows you to generate fractal shapes based on individual frames or sequences of frames, with an export option for each sequence of frames. Here is an example frame generated by Fractals for Sketchblock:
If you generate a sequence of frames transitioning the fractal to one state to another, you can then join the frames into a cool animation sequence!
I remember playing around with Fractal generation on the Amiga 500 back in the day - it used to take 10 minutes or more to render even a single low resolution screen fractal - nowadays it takes seconds!
To install Fractals for Sketchblock, you do need to install some other things first (if not already done).
Specifically you will need to download and install the following programs from os4depot.net first:
PIL - Python Imaging Library 1.17
ProAction 1.7
AISS 4.12
Sketchblock 2.6
Here is the PIL archive once extracted:
The Install_PIL program is a standard AmigaOS installer:
When done the installer will launch your default web browser to review the documentation about the library if you want to delve into Python scripting languages in more detail:
For those curious Python scripting language support is included as part of AmigaOS4.1.
I moved onto install ProAction 1.7 next, which involves extracting the ProAction archive into the SYS:Utilities folder (in my case), then running the ProActionCtrl program as shown in the folder below:
This will then register the correct location for the ProAction folder so it can be used by Fractals for Sketchblock. You can close the window that appears when the program is run, as we don't need to change anything in it.
AISS 4.12 installation is next - the Install program installer in the folder below, when run, installs everything with a shell script without a standard installer - just let it run to completion:
Ok, Sketchblock 2.6 is next to go now - simply extract the Sketchblock archive to where you want it. I chose SYS:Utilities/Sketchblock.
The final step is to install the Fractals for Sketchblock program - I extracted the archive downloaded (using the individual user id and password) to RAM: , which then gave me the following contents:
First I checked the Readme which explains to run the Install_FFSB program to install the program, and to remember that terms and conditions of using the program include agreeing that fractals are cool :-)
The Install_FFSB program is a standard AmigaOS installer:
Important part is the next question - make sure you select Yes below to add Fractals to the Misc Menu in Sketchblock:
Installation completed:
With the installation, completed, the Sketchblock folder now has a Fractals folder in it:
When running Sketchblock, you will see the program open as below - I moved the windows around a bit to make use of the X1000 screen space I have (click to expand):
Sketchblock does plenty of other graphical things as well, including supporting multiple layers, and even graphical tablet input:
The latest version is Sketchblock 2.6, released in late May 2014 - so this software is very much up to date!
There is plenty of help available in the Docs folder of the Sketchblock install folder if you want to learn more about the features:
Andy even produced a nice YouTube video of Sketchblock in action - I am really not a graphics artist, so I include his YouTube clip link here so you can see what actual talent can do with this software:
Today though, I am keen to play around with the Fractals for Sketchblock program. To access this, simply right click on the title bar menu, select Misc Menu and then the option called Fractals. You will then see the following screen:
In the screen above you put in all the various components used to generate a fractal. To start with, you can simply generate the simplest fractal by using the default settings - just select Render Frame to see the following output in Sketchblock:
From there I then click on the Open icon (4th icon down) in the middle of the Fractals for Sketchblock screen, and selected the Black_and_gold.py example Fractal Design.
This will then pre-populate the screen with the values for this example, and show the colours used in a separate window as below:
Here is the resulting fractal when I clicked on Render Frame:
It takes only a few seconds to generate on the X1000 and it looks cool!
Next I tried Rendering a sequence, using the strange_archipelago.py and also the inkspill.py examples:
When you render a sequence, you need to pick a location to store all the frames rendered. In this case 10 frames are listed in the Number of Frames field above, so Ten images are created, cycling from the Start to the Stop positions entered into the screen in the Start section and Stop section.
By default the generated images in a render sequence are output to RAM:, but you can choose other locations too of course:
Here is one of the frames of the strange_archipelago example:
Here is the some of the 10 frames from the inkspill example, so you can see what you get - You can see how the sequence changes with each frame, the output files are png files named frame_000.png, frame_001.png, etc:
This last image is a Animated png showing all the inkspill frames on a loop with a 1 second delay between each frame. Only works if your browser support APNG files:
I can see why it is called Inkspill!
The resolution can be increased from within Sketchblock if you want to generate a really high resolution fractal frame or sequence, 1920x1080 for example...
You can also save your settings for generating anytime without having to remember the data entered - especially useful if you make something that looks really cool that you want to keep! :-)
There is still a lot more to explore with this Fractals for Sketchblock program - I wanted to give you a small taste of what it can do so you can explore it and try things out for yourself!
It is certainly worth GBP5 to see what kinds of fractals you can generate with your X1000!
Monday, June 16, 2014
Saturday, June 14, 2014
Celebrating 2 Years On the X1000
It is amazing to consider that it has been just over two years since I received my "First contact" AmigaOne X1000 from AmigaKit. Has it been that long already?
Writing this blog has been a big part of that, sharing my experiences with the X1000 and provides various tips and tricks I found along the way, that hopefully would help other X1000 owners, and myself when I inevitably forget how I did something!
Some people have let me know that this blog was a big influence in their decision to buy an X1000 - I am so glad to hear stories like that! :-)
Although expensive, the X1000 is a good system, and offers Amiga users the fastest AmigaOS4.1 experience available right now. If you can afford it, please buy one - they are available from AmigaKit here with no pre-orders needed as I write this.
To my surprise I also got a lot of interest in the X1000 blog from lots of different countries, spanning many different languages! David Brunet from French Amiga website Obligement.free.fr has an agreement with me, and translates some of my blog posts into French too!
Wherever you come from, I am really glad if you find this blog interesting! I enjoy writing it!
The feedback and comments inspired me to try even more things, and push the X1000 as far as it could reasonably be pushed (within my financial means) during the last 2 years.
In the last year, some of the highlights for me included playing around with Qt4.7 and it's many new applications, NTFS support (taught me lots about Amiga file systems), Odyssey 1.23 with YouTube support, Directory Opus 5.9, Digibooster Pro 3, Catweasel Mk2 for X1000, Kryoflux, Games like Ace of Hearts, MACE, Huenison, Amazing Voxel Bird Saga, and of course having full screen 720p video playback with Liveforit MPlayer!
My blog entries on Qt4.7 framework on AmigaOS4.1.6 were by far the most popular over the last year, and indeed the most popular since I started this blog. I hope we see even more Qt4.7 applications in 2014 on AmigaOS4 as programmers get more familiar with how to use it.
My only regret over these past 2 years was not being able to go to the yearly AmiWest show to spend time talking Amiga with fellow X1000 owners (and other Amigans too).
This year is different! I have booked to attend AmiWest 2014 this year (including the programming seminar before the show itself), and can't wait to meet as many passionate Amigans as possible! If you are able to go to AmiWest this year, please go! I look forward to meeting you there!
I am also making an effort to be present on IRC reasonably regularly on the AmigaWorld channels, so maybe I'll chat to you there soon! I also keep a regular eye on Amigaworld.net, Amigans.net and amiga.org English Amiga forum websites.
Recently I have been working on Classic Amiga projects (especially Amiga 600) on my other blog http://classicamiga.blogspot.com.au, which has proved to be quite a distraction using a lot of time, but a project I wanted to finish as I have tried a few times to get it done in the past! I plan to get back to focusing on the X1000 again shortly I promise!
I was reflecting that with my other computers (Mac, PC) I average around 3-4 years before replacing them with the next generation model (where available). Probably when that time arrives for the X1000, we may have the new AmigaOne X5000 (Cyrus) system available to buy (no pressure Trevor!) - it is exciting to know we have an upgrade path for AmigaOS4 for the future.
For the present time, the AmigaOne X1000 is here now, and running AmigaOS4.1.6 on it is a lot of fun, with plenty more software and updates to come no doubt.
So now is a good time to get on board if you are not already, especially if you are a current or former Classic Amiga user who wants to try the latest AmigaOS4 on modern hardware - it really is a quantum leap forward.
Here's to the next year of the AmigaOne X1000!
A recent addition has been the USB dual SATA disk docking station (seen above on the X1000), which I use for periodic large data transfers to the X1000 of my music, videos and photos. (I can use the network too but for 1TB of content this method is much faster). This takes full advantage of the NTFS support recently introduced on the X1000.
I couldn't resist buying the AmigaOne X1000 poster and mounting it on my computer room wall, as it reminds me daily how great it is to have a current Amiga platform in 2014 right now, and that it still has a future! I have been a proud Amiga user since 1988 and looking forward to a few more years yet!
I have really enjoyed using the X1000 these past two years, and tried my best to get the best out of the system.
Some people have let me know that this blog was a big influence in their decision to buy an X1000 - I am so glad to hear stories like that! :-)
Although expensive, the X1000 is a good system, and offers Amiga users the fastest AmigaOS4.1 experience available right now. If you can afford it, please buy one - they are available from AmigaKit here with no pre-orders needed as I write this.
To my surprise I also got a lot of interest in the X1000 blog from lots of different countries, spanning many different languages! David Brunet from French Amiga website Obligement.free.fr has an agreement with me, and translates some of my blog posts into French too!
Wherever you come from, I am really glad if you find this blog interesting! I enjoy writing it!
The feedback and comments inspired me to try even more things, and push the X1000 as far as it could reasonably be pushed (within my financial means) during the last 2 years.
In the last year, some of the highlights for me included playing around with Qt4.7 and it's many new applications, NTFS support (taught me lots about Amiga file systems), Odyssey 1.23 with YouTube support, Directory Opus 5.9, Digibooster Pro 3, Catweasel Mk2 for X1000, Kryoflux, Games like Ace of Hearts, MACE, Huenison, Amazing Voxel Bird Saga, and of course having full screen 720p video playback with Liveforit MPlayer!
My blog entries on Qt4.7 framework on AmigaOS4.1.6 were by far the most popular over the last year, and indeed the most popular since I started this blog. I hope we see even more Qt4.7 applications in 2014 on AmigaOS4 as programmers get more familiar with how to use it.
My only regret over these past 2 years was not being able to go to the yearly AmiWest show to spend time talking Amiga with fellow X1000 owners (and other Amigans too).
This year is different! I have booked to attend AmiWest 2014 this year (including the programming seminar before the show itself), and can't wait to meet as many passionate Amigans as possible! If you are able to go to AmiWest this year, please go! I look forward to meeting you there!
I am also making an effort to be present on IRC reasonably regularly on the AmigaWorld channels, so maybe I'll chat to you there soon! I also keep a regular eye on Amigaworld.net, Amigans.net and amiga.org English Amiga forum websites.
Recently I have been working on Classic Amiga projects (especially Amiga 600) on my other blog http://classicamiga.blogspot.com.au, which has proved to be quite a distraction using a lot of time, but a project I wanted to finish as I have tried a few times to get it done in the past! I plan to get back to focusing on the X1000 again shortly I promise!
I was reflecting that with my other computers (Mac, PC) I average around 3-4 years before replacing them with the next generation model (where available). Probably when that time arrives for the X1000, we may have the new AmigaOne X5000 (Cyrus) system available to buy (no pressure Trevor!) - it is exciting to know we have an upgrade path for AmigaOS4 for the future.
For the present time, the AmigaOne X1000 is here now, and running AmigaOS4.1.6 on it is a lot of fun, with plenty more software and updates to come no doubt.
So now is a good time to get on board if you are not already, especially if you are a current or former Classic Amiga user who wants to try the latest AmigaOS4 on modern hardware - it really is a quantum leap forward.
Here's to the next year of the AmigaOne X1000!
Thursday, June 12, 2014
Amiga 600 CF AmigaOS Setup Part 2
Today I am continuing my work in Part 2 of building the AmigaOS3.1 install on my CF Card on the Amiga 600!
Please read Part 1 here first if you haven't already and want to follow from the beginning of the process to see what was done. I cover a lot of ground here.
Note that to extract an lha file on AmigaOS3.1 requires lha (from Aminet here). It is not included with AmigaOS3.1. I forgot to mention this in part 1 and thought I had better cover it. The command line I used for lha in this case is:
lha x file.lha RAM:
Normally you extract lha archives to RAM: and check the read me included in the archive for install instructions first.
You should update the default c:installer program that is included with AmigaOS3.1. Quite a few installers expect a newer version of the installer and will break without it.
There are quite a few installers to choose from such as InstallerNG and more - however I chose to use the Amiga Technologies Installer 43-3 available here on Aminet. Once installed (copy the installer program from RAM: to C:), it will support pretty much most installation programs written for AmigaOS3.
Below is the ACATune command line tool, which comes on a floppy disk with the ACA630 Accelerator installed in the Amiga 600. Just copy it wherever you want it on the SYS: drive, I put it in Sys:c so I can run it from anywhere as it is in the standard path - ACATune allows me to quickly poll the card to confirm it is working, and confirm it's current configuration:
In order to run AWeb web browser on the Amiga 600 (and other applications like DiskImageGUI too), I will need to install ClassAction 3.3 first - On AmigaOS 3.9 this is included, but on a base AmigaOS3.1 install I need to download it from Aminet and install it manually. There is a 3.6 version on Aminet but the 3.3 version is actually the later version, and the one you need for DiskImageGUI so grab that version (classact33.lha).
When extracted to RAM: you end up with two folders that need to be copied to the SYS:classes and SYS:prefs equivalent folders. I used Directory Opus 5.9 to do this:
The install of ClassAct 3.3 is then completed.
However I found when installing ClassAction earlier that the prefs program needs reqtools.library latest version to run. This can be downloaded from Aminet as well, the v39 version is here.
The V39 library you need to copy using the shell from RAM (once extracted) to the libs: folder. I check the version number in AmigaShell to make sure of the versions before copying the newer one to libs:
You can then run the CAPrefs program which is now in SYS:Prefs folder to confirm everything is working:
Next I extracted Directory Opus 5.9 to Sys:Utilities/Dopus5.
Here it is once extracted:
I could of installed Directory Opus 5.8 Magellan II (Which I own on floppy disks from 1998), but with the recent work done to update it and release the latest Directory Opus 5.9 in 2014 - including on AmigaOS3 version, I couldn't resist running the latest version on the Amiga 600.
Make sure you edit s:user-startup file to create an assign DOpus5: to wherever you extracted Directory Opus 5.9 to, in my case is sys:utilities/dopus5
;BEGIN DOpus5
Assign >NIL: DOpus5: SYS:Utilities/Dopus5
;END DOpus5
Then copy the Opus5_Startup and Opus5_Startup.info files from the WBStartup folder in the DOpus5 folder, to your SYS:WBStartup folder. This will then allow Directory Opus 5.9 to run automatically on boot.
Here it is, running on top of the standard AmigaOS3.1 Workbench (after I modified the preferences in Directory Opus 5 default fonts to use XEN font as per the rest of the Workbench - btw this font was installed by Magic WB2 in part 1 blog entry):
You can see that the Directory Opus 5.9 toolbar icons don't render very well in 8 colours on the Workbench - they are intended for AGA or higher colour Workbench screens. I plan to fix this by copying the original toolbar icons from Directory Opus 5.8 Magellan II to use instead, but for now keeping them there will help me with something else I want to try out shortly. ;-)
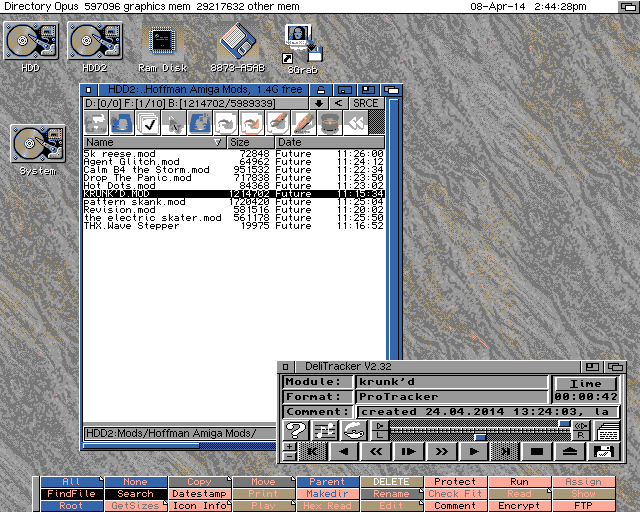
Another view below, running Delitracker 2.32 to play back one of Hoffman's recent excellent modules created on the Amiga:
Next I wanted to customise the Directory Opus 5.9 User Menu, which appears in the title bar of the AmigaOS Workbench.
Specifically, I wanted to add a new menu to put commonly used applications in it. You can use ToolManager or some other "dock" program on the Workbench for this, but on the Amiga 600 low resolution screen you lose a lot of real estate having it there. So I want to use the User Menus.
In the User Menu options, I have now added an Applications Menu, and a new item I will call Delitracker2 as below:
Next I have to edit the Delitracker2 item in the function editor. I click on the Cycle gadget until Workbench appears, then select the Delitracker2 program from the requester. It then populates the function editor screen as below:
I also added another entry for AmigaAmp, which I downloaded here and installed to use with the MAS Player hardware attached to my Amiga 600 (AmigaAmp not setup for this yet - patience!):
This Application Menu and the 2 Menu items I created now appear on the titlebar menu as below, making running these applications easy and quick:
While here, you may note that the border around the Workbench above is black - this is not standard in AmigaOS3.1. It is achieved using a program called Border Blank - available on Aminet here. Just copy the extracted bblank file only to the SYS:c folder, and add c:bblank to the s:startup-sequence file, after the line c:iprefs. This is shown below:
After a reboot you should have a black border around your AmigaOS3.1 Workbench screen! Much cleaner looking.
In the default AmigaOS3.1 installation, the default program for viewing Images, AmigaGuide files, Sound files and so on is a program called Multiview. However, this is limited to the very limited number of datatypes included in AmigaOS3.1 to use it.
Fortunately plenty of work has been done to improve datatype support in AmigaOS3.1, particularly via the Warp Datatypes available from Aminet (many others are available there too of course). These Warp Datatypes are shareware, but work fine for 30 days for you to try out and decide if you want to keep using them or not.
Here are Warp Datatypes folders extracted for PNG, BMP, JPG, TIFF and PCX image files, and PSD files too - plenty of install work to do here:
When I ran the Warp PNG installer though, I hit an issue with the picture.datatype version not being high enough - basically saying I need AmigaOS3.5 or higher to run it...
I fixed this problem by installing Picasso96, also downloaded from Aminet here. This will update the picture.datatype to a version compatible with the installer. When installing Picasso96, select the Graffity driver and accept the defaults.
A reboot is needed after installing Picasso96. Ensure that the Workbench Screen mode prefs is set to use the standard PAL screen mode before rebooting and remove the Graffity file in Sys:Devs/monitors, as we don't plan to use Picasso96 here - we just want the updated picture datatype to allow the installation of the Warp datatypes to install and work.
Whew. Lots of installs to do. Really.
Next up is a fascinating thing I read in this forum thread here (mostly in German but the important bit is the first post and subsequent information posts in English) that allows you to run a 256 colour AmigaOS3.1 Workbench display on the Amiga 600 using the Indivision ECS!
How . Cool . Is . That!
It looks like a lot of work (and is) - the alpha driver status makes it a bit unreliable, but I wanted to try it out! The procedure in the link assumes a lot of knowledge, and I wanted to explain it a bit more so hopefully more people can get it working on their setup! If nothing else it is a reminder for me how to do it later on!
There are newer driver versions up to 0.2w - these didn't work for me, but links are available on the forum thread if you want to try the later versions out.
First I downloaded all the files above.
I extracted the Indivision_ECS_V101.lha to my SYS:utilities folder, which looks like this:
When I run the Indivision_ECS_Config tool I get this display of the Indivision ECS currently installed in the Amiga 600:
I only have one Indivision ECS installed, so only one is visible.
The Mode button under Miscellaneous Settings allows us to change whether the output is 1.0 (PAL) or 1.25 (NTSC), with the option to use Graffiti mode in either (or not at all).
The Graffiti mode can be used by Picasso96 to display a higher colour Workbench (or screen) on the Amiga 600!
I already installed Picasso96 earlier in this post so we are good to go on that front.
But there is a catch that stops it working - the Indivision ECS "bus" speed is insufficient to send through the required data throughput for a higher resolution screen and colour depth.
A suite of programs called MMULib (Available on Aminet as above) needs to be installed for this to work. It uses the MMU on the ACA630 accelerator to manage data going through the Indivision ECS to keep the performance acceptable. You must have an Accelerator with an MMU to use this - the default Amiga 600 does not have it. Please don't ask the technical details of this MMULib process - I have no idea - it just works!
When installing MMULib, Please use the default install MMULib modules selected already - this program is a bit daunting with many options to trap the unwary:
Once installed, I turned my attention back to the Indivision ECS.
In order to get the 256 colour Workbench working, we need to upgrade the firmware in the Indivision ECS to the 1.10 Core INDIVECS.UPD file we downloaded.
I copied the v1.10 INDIVECS.UPD file extracted (by PC) from the 7zip archive file to the Indivision ECS config folder we extracted earlier.
We can check/update the Indivision ECS firmware by using the Indivision Flash tool included in the Indivision ECS config folder.
When running the Indivision Flash tool, I can confirm I am running v1.01 as below, so I need to upgrade the firmware:
I strongly recommend you backup the current v1.01 firmware to a file on your system before attempting to upgrade the firmware. (I backed up to INDIVECS.UPD.ORIG) This will allow you to boot using the Amiga 600 AV out to re-flash it back to v1.01 (if something goes wrong during the upgrade).
Needless to say, when you tell it to flash the core (and select the v1.10 INDIVECS.UPD file), it makes sure you really want to do this - I take no responsibility if you do this and brick your Indivision ECS.
I didn't write the new firmware and cannot vouch it works for everyone - it worked for me, but please back up the current Indivision ECS firmware first to protect yourself:
The flashing process runs, and when complete, close and reopen the Indivision Flash tool - it will then show the upgraded firmware version, like below:
There are a bunch of files from the PIC96IEC_0.2.lha file that you need to copy to the right places, which contain the INDI monitor (Devs:Monitors), picasso96settings (DEVS:), screenmode.prefs (ENVARC:sys/) and the picasso96.library and Picasso96 subfolder (both to LIBS:) containing the card driver for Indivision ECS (INDI.card).
The upshot of this is that you don't need to configure the screen modes or picasso96 settings yourself - it is done already correctly configured for the Indivision ECS!
In testing I found that only the version 0.2b INDI.card Picasso96 driver worked on the Amiga 600 with Indivision ECS. The later version drivers didn't display correctly at all for me, and was unusable. Your mileage may vary! This is what I got with the later drivers in case you are curious - as I said, unusable:
Note that you can't change the screen mode when using the working 0.2b driver - you must leave it as configured in the files you copied. Later versions let you change it, but those versions didn't work for me as I covered above.
We are not finished the setup yet, though.
Once done, you need to modify the properties of the Sys:Devs/Monitors/INDI icon. Highlight the tool type SoftSprite=No as below:
Modify it so it says SoftSprite=Yes, press Enter to update, and it should appear similar to below:
Then click Save. This change is needed, otherwise the mouse pointer is not visible!
Now reboot, and cross everything it works properly.
On boot up the MMULib initialises, and connects to the Indivision ECS as below:
Note that the screen flashes a blue/black colour for a second while initialising before the Workbench displays in the correct resolution and colours, just wait a bit for the warning message above to change the resolution automatically for you - you don't need to do anything except wait.
And here it is, my 256 colour AmigaOS3.1 workbench working on the Amiga 600, using the Indivision ECS, looking fantastic in 800x600:
(Off topic: for some reason my date keeps resetting to April 2014 - still need to find out why that is happening!)
You can see the Directory Opus toolbar icons are now rendered correctly on the Amiga 600 with 256 colours now available on the Workbench - this is why I kept the default icons to test this:
Seriously cool in my opinion!
Didn't expect to be doing this as part of the CF build, but I saw the thread and really wanted to try it - it works!
Here is the Screenmode preferences using the INDI driver for those curious - it uses a 640x400 resolution modified from default sizes to 800x600, which fills the screen correctly with no scrolling, presumably using MMUlib to achieve this:
Please read Part 1 here first if you haven't already and want to follow from the beginning of the process to see what was done. I cover a lot of ground here.
Note that to extract an lha file on AmigaOS3.1 requires lha (from Aminet here). It is not included with AmigaOS3.1. I forgot to mention this in part 1 and thought I had better cover it. The command line I used for lha in this case is:
lha x file.lha RAM:
Normally you extract lha archives to RAM: and check the read me included in the archive for install instructions first.
You should update the default c:installer program that is included with AmigaOS3.1. Quite a few installers expect a newer version of the installer and will break without it.
There are quite a few installers to choose from such as InstallerNG and more - however I chose to use the Amiga Technologies Installer 43-3 available here on Aminet. Once installed (copy the installer program from RAM: to C:), it will support pretty much most installation programs written for AmigaOS3.
Below is the ACATune command line tool, which comes on a floppy disk with the ACA630 Accelerator installed in the Amiga 600. Just copy it wherever you want it on the SYS: drive, I put it in Sys:c so I can run it from anywhere as it is in the standard path - ACATune allows me to quickly poll the card to confirm it is working, and confirm it's current configuration:
In order to run AWeb web browser on the Amiga 600 (and other applications like DiskImageGUI too), I will need to install ClassAction 3.3 first - On AmigaOS 3.9 this is included, but on a base AmigaOS3.1 install I need to download it from Aminet and install it manually. There is a 3.6 version on Aminet but the 3.3 version is actually the later version, and the one you need for DiskImageGUI so grab that version (classact33.lha).
When extracted to RAM: you end up with two folders that need to be copied to the SYS:classes and SYS:prefs equivalent folders. I used Directory Opus 5.9 to do this:
The install of ClassAct 3.3 is then completed.
However I found when installing ClassAction earlier that the prefs program needs reqtools.library latest version to run. This can be downloaded from Aminet as well, the v39 version is here.
The V39 library you need to copy using the shell from RAM (once extracted) to the libs: folder. I check the version number in AmigaShell to make sure of the versions before copying the newer one to libs:
Next I extracted Directory Opus 5.9 to Sys:Utilities/Dopus5.
Here it is once extracted:
I could of installed Directory Opus 5.8 Magellan II (Which I own on floppy disks from 1998), but with the recent work done to update it and release the latest Directory Opus 5.9 in 2014 - including on AmigaOS3 version, I couldn't resist running the latest version on the Amiga 600.
Make sure you edit s:user-startup file to create an assign DOpus5: to wherever you extracted Directory Opus 5.9 to, in my case is sys:utilities/dopus5
;BEGIN DOpus5
Assign >NIL: DOpus5: SYS:Utilities/Dopus5
;END DOpus5
Then copy the Opus5_Startup and Opus5_Startup.info files from the WBStartup folder in the DOpus5 folder, to your SYS:WBStartup folder. This will then allow Directory Opus 5.9 to run automatically on boot.
Here it is, running on top of the standard AmigaOS3.1 Workbench (after I modified the preferences in Directory Opus 5 default fonts to use XEN font as per the rest of the Workbench - btw this font was installed by Magic WB2 in part 1 blog entry):
You can see that the Directory Opus 5.9 toolbar icons don't render very well in 8 colours on the Workbench - they are intended for AGA or higher colour Workbench screens. I plan to fix this by copying the original toolbar icons from Directory Opus 5.8 Magellan II to use instead, but for now keeping them there will help me with something else I want to try out shortly. ;-)
Another view below, running Delitracker 2.32 to play back one of Hoffman's recent excellent modules created on the Amiga:
Next I wanted to customise the Directory Opus 5.9 User Menu, which appears in the title bar of the AmigaOS Workbench.
Specifically, I wanted to add a new menu to put commonly used applications in it. You can use ToolManager or some other "dock" program on the Workbench for this, but on the Amiga 600 low resolution screen you lose a lot of real estate having it there. So I want to use the User Menus.
In the User Menu options, I have now added an Applications Menu, and a new item I will call Delitracker2 as below:
Next I have to edit the Delitracker2 item in the function editor. I click on the Cycle gadget until Workbench appears, then select the Delitracker2 program from the requester. It then populates the function editor screen as below:
I also added another entry for AmigaAmp, which I downloaded here and installed to use with the MAS Player hardware attached to my Amiga 600 (AmigaAmp not setup for this yet - patience!):
This Application Menu and the 2 Menu items I created now appear on the titlebar menu as below, making running these applications easy and quick:
While here, you may note that the border around the Workbench above is black - this is not standard in AmigaOS3.1. It is achieved using a program called Border Blank - available on Aminet here. Just copy the extracted bblank file only to the SYS:c folder, and add c:bblank to the s:startup-sequence file, after the line c:iprefs. This is shown below:
After a reboot you should have a black border around your AmigaOS3.1 Workbench screen! Much cleaner looking.
In the default AmigaOS3.1 installation, the default program for viewing Images, AmigaGuide files, Sound files and so on is a program called Multiview. However, this is limited to the very limited number of datatypes included in AmigaOS3.1 to use it.
Fortunately plenty of work has been done to improve datatype support in AmigaOS3.1, particularly via the Warp Datatypes available from Aminet (many others are available there too of course). These Warp Datatypes are shareware, but work fine for 30 days for you to try out and decide if you want to keep using them or not.
Here are Warp Datatypes folders extracted for PNG, BMP, JPG, TIFF and PCX image files, and PSD files too - plenty of install work to do here:
When I ran the Warp PNG installer though, I hit an issue with the picture.datatype version not being high enough - basically saying I need AmigaOS3.5 or higher to run it...
I fixed this problem by installing Picasso96, also downloaded from Aminet here. This will update the picture.datatype to a version compatible with the installer. When installing Picasso96, select the Graffity driver and accept the defaults.
A reboot is needed after installing Picasso96. Ensure that the Workbench Screen mode prefs is set to use the standard PAL screen mode before rebooting and remove the Graffity file in Sys:Devs/monitors, as we don't plan to use Picasso96 here - we just want the updated picture datatype to allow the installation of the Warp datatypes to install and work.
Whew. Lots of installs to do. Really.
Next up is a fascinating thing I read in this forum thread here (mostly in German but the important bit is the first post and subsequent information posts in English) that allows you to run a 256 colour AmigaOS3.1 Workbench display on the Amiga 600 using the Indivision ECS!
How . Cool . Is . That!
It looks like a lot of work (and is) - the alpha driver status makes it a bit unreliable, but I wanted to try it out! The procedure in the link assumes a lot of knowledge, and I wanted to explain it a bit more so hopefully more people can get it working on their setup! If nothing else it is a reminder for me how to do it later on!
Indivision_ECS_V101.lha Config Tools: http://www.icomp.de/products/indivision_ECS_e.htm
IndivisionCore 1.1 http://www.a1k.org/forum/showpost.ph...9&postcount=32 indivecs.7z.lha
(Note the last file is a 7zip and lha file - I used a pc to extract the 1.1 INDIVECS.UPD file)
(This contains the 0.2b INDI.card driver and Picasso96 config files)
First I downloaded all the files above.
I extracted the Indivision_ECS_V101.lha to my SYS:utilities folder, which looks like this:
When I run the Indivision_ECS_Config tool I get this display of the Indivision ECS currently installed in the Amiga 600:
I only have one Indivision ECS installed, so only one is visible.
The Mode button under Miscellaneous Settings allows us to change whether the output is 1.0 (PAL) or 1.25 (NTSC), with the option to use Graffiti mode in either (or not at all).
The Graffiti mode can be used by Picasso96 to display a higher colour Workbench (or screen) on the Amiga 600!
I already installed Picasso96 earlier in this post so we are good to go on that front.
But there is a catch that stops it working - the Indivision ECS "bus" speed is insufficient to send through the required data throughput for a higher resolution screen and colour depth.
A suite of programs called MMULib (Available on Aminet as above) needs to be installed for this to work. It uses the MMU on the ACA630 accelerator to manage data going through the Indivision ECS to keep the performance acceptable. You must have an Accelerator with an MMU to use this - the default Amiga 600 does not have it. Please don't ask the technical details of this MMULib process - I have no idea - it just works!
When installing MMULib, Please use the default install MMULib modules selected already - this program is a bit daunting with many options to trap the unwary:
Once installed, I turned my attention back to the Indivision ECS.
In order to get the 256 colour Workbench working, we need to upgrade the firmware in the Indivision ECS to the 1.10 Core INDIVECS.UPD file we downloaded.
I copied the v1.10 INDIVECS.UPD file extracted (by PC) from the 7zip archive file to the Indivision ECS config folder we extracted earlier.
We can check/update the Indivision ECS firmware by using the Indivision Flash tool included in the Indivision ECS config folder.
When running the Indivision Flash tool, I can confirm I am running v1.01 as below, so I need to upgrade the firmware:
I strongly recommend you backup the current v1.01 firmware to a file on your system before attempting to upgrade the firmware. (I backed up to INDIVECS.UPD.ORIG) This will allow you to boot using the Amiga 600 AV out to re-flash it back to v1.01 (if something goes wrong during the upgrade).
Needless to say, when you tell it to flash the core (and select the v1.10 INDIVECS.UPD file), it makes sure you really want to do this - I take no responsibility if you do this and brick your Indivision ECS.
I didn't write the new firmware and cannot vouch it works for everyone - it worked for me, but please back up the current Indivision ECS firmware first to protect yourself:
The flashing process runs, and when complete, close and reopen the Indivision Flash tool - it will then show the upgraded firmware version, like below:
There are a bunch of files from the PIC96IEC_0.2.lha file that you need to copy to the right places, which contain the INDI monitor (Devs:Monitors), picasso96settings (DEVS:), screenmode.prefs (ENVARC:sys/) and the picasso96.library and Picasso96 subfolder (both to LIBS:) containing the card driver for Indivision ECS (INDI.card).
The upshot of this is that you don't need to configure the screen modes or picasso96 settings yourself - it is done already correctly configured for the Indivision ECS!
In testing I found that only the version 0.2b INDI.card Picasso96 driver worked on the Amiga 600 with Indivision ECS. The later version drivers didn't display correctly at all for me, and was unusable. Your mileage may vary! This is what I got with the later drivers in case you are curious - as I said, unusable:
Note that you can't change the screen mode when using the working 0.2b driver - you must leave it as configured in the files you copied. Later versions let you change it, but those versions didn't work for me as I covered above.
We are not finished the setup yet, though.
Once done, you need to modify the properties of the Sys:Devs/Monitors/INDI icon. Highlight the tool type SoftSprite=No as below:
Modify it so it says SoftSprite=Yes, press Enter to update, and it should appear similar to below:
Then click Save. This change is needed, otherwise the mouse pointer is not visible!
Now reboot, and cross everything it works properly.
On boot up the MMULib initialises, and connects to the Indivision ECS as below:
Note that the screen flashes a blue/black colour for a second while initialising before the Workbench displays in the correct resolution and colours, just wait a bit for the warning message above to change the resolution automatically for you - you don't need to do anything except wait.
And here it is, my 256 colour AmigaOS3.1 workbench working on the Amiga 600, using the Indivision ECS, looking fantastic in 800x600:
(Off topic: for some reason my date keeps resetting to April 2014 - still need to find out why that is happening!)
You can see the Directory Opus toolbar icons are now rendered correctly on the Amiga 600 with 256 colours now available on the Workbench - this is why I kept the default icons to test this:
Seriously cool in my opinion!
Didn't expect to be doing this as part of the CF build, but I saw the thread and really wanted to try it - it works!
Here is the Screenmode preferences using the INDI driver for those curious - it uses a 640x400 resolution modified from default sizes to 800x600, which fills the screen correctly with no scrolling, presumably using MMUlib to achieve this:
Is it fast - hmmm, not great performance to be honest, the screen refresh slows down a lot with larger windows open, but you can work with it. Screen switching to run programs in PAL/NTSC works, but sometimes will crash or hang trying to come back to the Workbench again. It is an alpha driver after all - very promising work so far though!
I will convert back to the standard PAL interlace screen mode with 8 colours for normal use, but this was fun to setup and play with. I can now set the Amiga 600 to this mode anytime I want to test stuff in 256 colours at 800x600 resolution!
Plenty more build work and configuration still to do - I will continue this build in part 3 soon!
Subscribe to:
Posts (Atom)