As regular readers would know, I spent a bit of time recently upgrading my Amiga 500 to use with my ACA500 Plus solution. I covered this build over a series of blog posts - Part 1 Part 2 Part 3.
In doing so I created a great AmigaOS 3.2 Amiga 500 with Ethernet module internet and QNAP access, Indivision ECS, and a cool looking ACA500 setup with ACA1233n 68030 accelerator and 128MB memory.
I love the setup of that machine, but I also want to have a basic Amiga 500 running Kickstart 1.3 with the original Commodore A590 and A570 external drives. I never owned the A590 and A570, and I really wanted to have them. I finally managed to track both of them down in 2023.
However, having to swap them out on the Amiga 500 with the ACA500plus in plexiglass case is difficult because of the VGA pass through from inside the A500 being mounted on the ACA500 plus plexiglass rear. I would have to disassemble the A500 every time I wanted to change them over!
So I decided to utilise the Amiga 500 I have in my Checkmate 1500 plus case for this purpose. I had to think about that a lot since it meant losing the ability to easily re-implement the cool upgrades I used to use in it. However I decided to proceed anyway, and hope that I could find another Amiga 500 system I can use for the Checkmate 1500 Plus case again later on.
So, I got to work removing the Amiga 500 board I put into the Checkmate 1500 Plus - a job I was quickly reminded of how annoying it is to do.
As shown above, I had to remove everything in the Checkmate 1500 plus case - Drive bays, PSU, Zorro expansion header - everything. Then I could finally remove the A500 board.
I still have attached the Indivision ECS v3, DF0 selector to switch DF1 as DF0 under Kickstart 1.3, and an AmigaKit 512k memory expansion card and RTC battery option attached.
I pulled out the old bottom shield for the A500, since it would have to be put back in it again to re-house in the original A500 case again.
This then made me realise I had to remove all the screws from the ports on the A500 board, since they need to be connected after the board is reseated in the bottom shield.
Have I mentioned that I hate taking these off and on again?
You can see the reason why I have to do this annoying job when looking at the cut outs on the bottom shield.
Anyway, I then seated the A500 board back into the bottom shield and screwed it into the base.
I then put those annoying screws back in one by one...
I have a non-functional A500 in a case too, so I took the working keyboard from it to use in the original A500 case, since I took it's keyboard to use in the Checkmate 1500 plus custom keyboard case. I don't want to remove it from there, since I plan to use the Checkmate 1500 plus again in the future.
With that done, I routed the df0 selector switch to the expansion bay.
This is not permanent, but I needed to put it somewhere! I can't use the zorro port on the left like I used to do, as the A590/A570 connector has no gap on it's connector to pass it through the gap there, unlike the ACA500 plus which is much thinner.
This leaves the other problem of what to do with the Indivision ECS VGA port and cable, which I also can't pass through the zorro port anymore. Temporarily I fed it out the back without sealing the case.
I don't want to cut holes in the empty space at the back of the case to feed it out, and the VGA cable doesn't reach that far anyway, so I am still debating what to do with that...
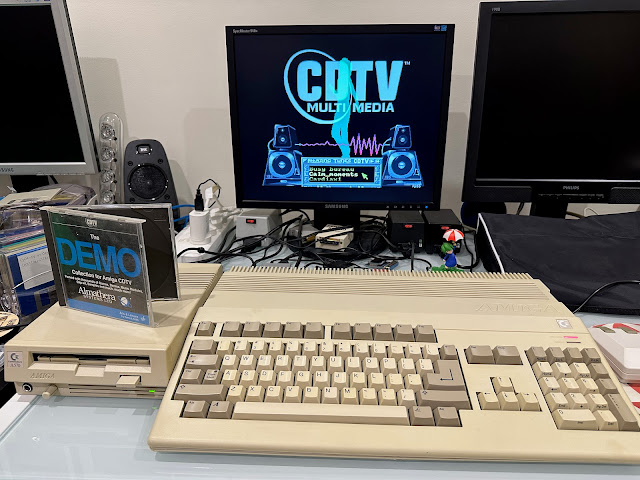
Anyway, you can now see the rebuilt A500 next to my other recently completed A500 AmigaOS 3.2.2 project, which is using the ACA500 plus, ACA 030 accelerator and network module in plexiglass case.
I hooked up the A500 to make sure it still worked after all that! Please to say it survived the transplant intact!
I mentioned earlier that I managed to find an A590 and A570 second hand. The A590 was a locally sourced unit, and the A570 came from the UK.
The A590 came in its original box in remarkably good condition (!), but unfortunately had no power supply included.
It arrived in good condition, and even has 2MB memory option installed, alongside the massive 20MB XT hard drive, which makes this A590 weigh a ton.
At the rear you can see the SCSI DB25 connector, SCSI ID selector, and the power supply port.
The unit is in great condition cosmetically, but was supplied as untested since there was no power supply.
Here is the underside - you can see the metal frame underneath the unit which actually sits underneath the main A500 unit when connected, to provide support to prevent the connector cracking when it is lifted up with the A500 together:
I needed a power supply though before I could use it.
Luckily the power supply is the same one used for the CD32, so I was able to buy a brand new power supply from RetroKit, a local Australian Amiga dealer based in Perth.
I also bought another A500 standard power supply from them, to use with my additional A500 so I didn't need to use the old brick power supply. Here they are below - much smaller than the original ones, and much lighter too.
I could then connect the A500 and the A590 together and power them up.
Lights come on, but just a grey screen. Hard disk light stays on solid.
If I booted from floppy disk, I could reach the workbench fine, but the hard disk in the A590 was not visible.
I can see the additional 2MB fast memory though, so the A590 is working - that part anyway.
I suspect the XT hard disk has failed, and to be honest I intended to replace it anyway!
So, next I turned it all off and pulled apart the A590 to replace the old XT 20MB hard disk.
That is one very big and very heavy hard disk!
Because it is an XT drive type and not IDE (even though the cable connector is the same size as IDE), you can't replace it with a IDE drive. You need to use the SCSI connector, which is also available internally on the A590:
Next, I also needed to remove the metal case covering the main board. This is screwed in from below and also from the side next to the zorro connector. Unfortunately this is why I can't feed the cables (df0 selector and VGA cable) through the gap, as the metal case cover fills all the remaining space when connected into the A500...
This case removal is so I could change over the A590 main board LED pin header selector from XT to SCSI. I can then see the disk activity from the SCSI disk via the front LED:
I thought that not using the metal cover at all would give me the space needed for the vga cable and df0 selector to route out via the zorro connector on the A500, but unfortunately the screws needed to secure the A590 to the base, and the scsi hard disk above it, are included in the metal cover as below:
I previously prepared an
Aztecmonster SCSI to CF adapter card for my CDTV which I ultimately didn't use with it.
I still have it, so using my
Windows 11 Alienware PC I wrote out to CF card my backed up Workbench 1.3 CF card image I use on the Amiga 1000 also, to use with the AztecMonster.
I powered it on and it works! Workbench 1.3 booted from the CF card using the Aztecmonster in the A590! Exciting!
However, I couldn't see the partitions beyond the first one. So I removed the A590 case again to locate the SCSI roms on the main board, which are v6.0 as below. These roms have limited drive size support.
I have slightly newer v6.6 ROMS on my no longer used A2091 scsi card:
So I next worked to remove them from it and put them into the A590 to replace the V6 roms. This should then allow the A500 system to see the full 1GB.
The old roms were quite hard to remove with the chip extractor, but I got there in the end.
Here is the A590 board with the newer v6.6 roms installed:
Unfortunately, no more than 1GB though - I hit the same issue on my Amiga 2000 when it ran Kickstart 1.3. It sees the higher partitions above 1GB, but they are not available. So, I turn auto mount for them off in HDToolbox to stop them showing.
The scsi cable included with the A2091 is way too short for the aztec monster to fit onto the metal case. It wouldn't even fit in the case with it, as below!
So I used my ridiculously long internal scsi cable instead. I also disconnected the noisy fan in the A590, as I will no longer need it with the Aztecmonster and CF card installed.
With the longer scsi cable I could then mount the Aztec monster card onto the existing pin holes the XT drive used to use.
I then did up the case again - 20MB XT is now 1GB SCSI :-)
All connected back to the A500 now, it boots up fine from the CF Card into Workbench 1.3:
I see the two 512MB partitions put to 1GB as expected, thanks to the upgraded 6.6 roms. If i had v7 that would be better as it would allow me to use the whole CF card capacity, but 1GB is much better than 20MB!
The A590 looks great. The design is a bit strange that it doesn't align with the A500 case angle, but that is due to the XT drive being so big inside. GVP made one that did align nicely - I used to have it, but sold it a long time ago when getting money together for my dream A4000T.
The A590 is great for putting floppy disks on though for multi-disk games that don't use external drives :-)
I ran some demos and applications from the hard disk to celebrate!
Octamed - great to listen to modules from hard disk on this setup:
As this hard disk Workbench 1.3 image was originally from my A2000 I owned from new, it still has the applications and data I used back in 1991, including school assignments me and my brother wrote in Pen Pal over 30 years ago! What a time capsule!
Moving on now to the A570, the CDTV drive for the Amiga 500.
Commodore released this A570 expansion I believe to appease A500 owners who couldn't play CDTV titles. Many A500 owners didn't see the value in trading up to the CDTV given it was just an Amiga 500 with a few extra functions, housed in a pretty stereo component housing.
Multimedia was not well explained or understood at the time - the CDTV was way ahead of its time.
I actually
have a CDTV already, and I have
done some upgrades on it too, but I was thinking this A570 would be great as a backup, and also useful to be able to read CD's on my A500 system.
A570 can't be connected at the same time as the A590, which is a crazy thing but due to bus mastering or some such thing for Autoboot functionality to work.
It makes the A570 instantly far less useful since I can't boot from hard disk and use the CD as well, it is either/or. It does work though, when I powered it on.
Not being able to use the CDTV controller with the A500, makes navigating the menus very clunky, and unfortunately I have no manual for the A570...so it was trial and error.
I tried a CDTV title, the welcome CD.
It booted fine, which was a big relief.
I then tried playing audio CD's too - some Lizardking makes logical sense!
It works well too. The A570 has pass through RCA audio plugs on the back, so the A500 audio out connects to it, then RCA out to your speakers. So you hear both.
I tried out Defender of the crown CDTV version next (I bought the re-released boxed version quite a few years back), and the CD audio and game works great:
CDTV Demo CD is also working well, I can enjoy many modules on it with the cool CDTV animation while it plays:
Lastly, I tested Lemmings CDTV, which works great, but offers nothing over the normal A500 disk version - it was a straight port.
So, I had some thoughts on how to resolve the issue of not being able to use the hard disk and A570 CD drive at the same time.
Generally most internal options require Kickstart 3.x to work.
I found the potential solution option of the IDE68k + fast ram upgrade from amigastore.eu, which you can option a specially prepared 1.3 kickstart rom. This modified rom apparently allows auto booting from the ide port attached to the IDE68k add-on under 1.3.
Sounds promising, as the A570 CD drive needs 1.3 to work. So maybe they work together, allowing me a hard drive and CD on this A500?
So I decided to buy this IDE68k and modified kickstart 1.3 rom to try it.
When it arrived, I noted it includes instructions (excellent after the Furia debacle), and some cables to connect to specific pins on some chips on the A500.
As an aside, I didn't come up with a solution for routing the indivision ecs vga cable output with the A570/A590 attached, so I decided to remove it altogether, and rely for now on the same
Microbee scan doubler I use for the Amiga 1000, which also doesn't have an internal scandoubler.
I installed the 1.3 modified kickstart first.
I then removed the 68000 CPU carefully, so I could then put the IDE68k there, and place the 68000 CPU on top of it. The instructions were very handy and the colour photos really help here.
Here is the IDE68k installed on the 68000 CPU socket.
I then put the 68000 CPU in the pin holes provided on top. No socket here, so I had to be careful.
The pins at the top of the IDE68k are used for the cables to connect to specific pins.
I completed that work as per the instructions:
I then fired up the A500 to confirm the Kickstart 1.3 rom is working, and the IDE68k fast memory also.
I booted from a Workbench 1.3 disk and confirmed the system boots up as expected, with the Fast memory working also. Lots of free memory now.
It was at this point I discovered the first issue I didn't expect...the IDE port on the IDE68k is a standard 40 pin IDE port, not the typical laptop 44 pin 2.5" IDE port. This means I need to use a standard IDE drive here.
These days I don't use standard IDE hard drives, everything is CF card or SD-Card using converters. But these converters are normally laptop 44pin 2.5" IDE port ones. I have to order a 40 pin one, as I don't have any spares of those. Except the True IDE thing I have but never seems to work with anything, despite being made for Amiga...
Because of the 68000 cpu location on top of the IDE68k, I can't use the horizontal connector on the TrueIDE as it doesn't clear the 68000 CPU. It has to sit vertical, which of course is useless as I can't close the case.
The next problem is it needs a floppy disk power connector. And the A500 only has one, for the floppy drive itself. I tried connecting an external one temporarily just to try it out.
And...it didn't work. At all. As usual, this TrueIDE is completely useless. I really should chuck it out, but I keep hoping it will actually work one day..anyway.
So, next, I tried connecting the A590 hard disk, to see if it plays nice with the IDE68k with no hard disk attached.
I booted from Workbench 1.3 and the hard disk is not shown or detected in hdtoolbox.
I assume the onboard IDE is using the scsi.device name and conflicting I guess. Or Autoboot for the IDE port prevents the A590 from mounting?
Curiously I also now have less memory. Not sure if the 2MB on the A590 is conflicting somehow?
Anyway. Next, I removed the A590 and connected the A570 CD drive. With the CD drive attached with the IDE68k the system refuses to boot at all.
So it is clear the IDE68k solution is not going to do what I wanted to achieve with this system, which is an internal hard disk with usable A570 Cd drive attached.
I suppose I could just run a normal SCSI external cd drive using the SCSI port on the A590 and forget about the A570, but I lose the CDTV compatibility then.
So for now I will use the A590 hard disk with the standard 1.3 kickstart, and remove the IDE68k.
I'll have to have a further think about how I can make the CD drive work with an onboard hard disk solution under kickstart 1.3. Any suggestions please let me know!


