Way back in June this year, I setup an Amiga 500 to use the original Commodore A590 and A570 CD drives, with other upgrades as well. You can see that post here.
Why is that relevant? Well, at that time I pulled apart my Checkmate 1500 Plus case with an Amiga 500 motherboard and Pistorm upgrade to use for that, leaving the Checkmate case without a computer, and also without a Pistorm setup anymore.

With the recent release of
AmiKit Pistorm, I was very keen to try it out on my Amiga 500 Pistorm setup, but that of course meant I would have to build another Amiga 500 back into the Checkmate 1500 plus case again.
Problem was, I didn't have another Amiga 500 board I could use for this.
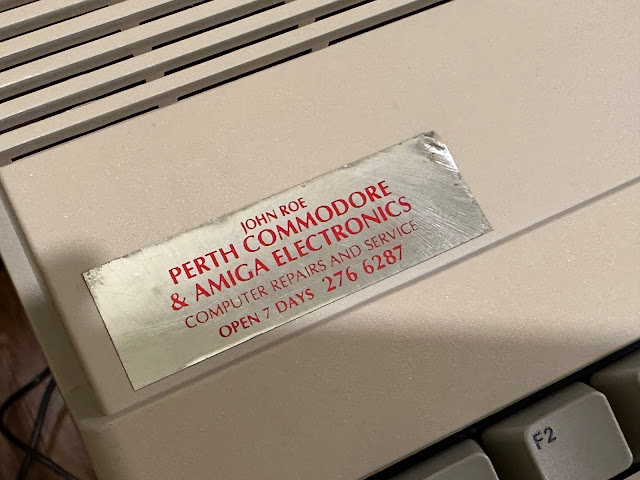
As fate would have it, I attended the Perth Amiga User Group meeting around the same time, and entered a raffle for an Amiga 500. To my surprise, I won the raffle, and got myself an Amiga 500 to use for this project!

I put it carefully into my suitcase for the flight home, and fired it up and confirmed it worked - and I am glad to say it did!
This Amiga 500 had a Kickstart 1.2 rom in it, and no upgrades at all. Totally vanilla:
This made it the perfect machine to use for re-building my Pistorm setup in the Checkmate 1500 Plus case, so I could try out the new AmiKit Pistorm!
For some nostalgia I fired up Nevermind using floppy disk to check the drive was working too.
This game is not a great game, but it was the very first game I bought for my Amiga using my own money - it was a $5 bargain bin special I got at Bruining Headlam computers in Perth, as I lived there back then. Seems appropriate to use it for testing this Amiga 500 I got from Perth!
The other problem I had since August was time. I simply haven't had any for the past few months. Work has been so busy, and I have been travelling a lot setting up new offices overseas, which has left little time for projects like this, or indeed my blog. Sorry about that, but I am glad to have some time to blog now.
In the last week, I finally had some rare free time on the weekend, and so I quickly got to work!
I opened up the Amiga 500 case and added the upgrades I had previously on my Pistorm setup - First of all the
Indivision V3 scan doubler (which is currently out of stock sadly):
I don't need to worry about routing the cables, since this will be removed entirely from this case to be put into the Checkmate 1500 plus case.
Next up I removed the 68000 CPU chip, and installed the Pistorm 500 in it's place - you can buy these from most Amiga dealers - locally in Australia we can get them (and the Pi) without the terrible overseas shipping costs from
RetroKit:
I then connected my Raspberry Pi 3A to the Pistorm 500 port connector:
This pi 3A has been using an old Pistorm distribution from
when I originally setup the Pistorm in 2021, which is very different to the Emu68 distribution used on modern Pistorm setups, including the AmiKit 12 Pistorm distribution.
I will replace it with the AmiKit Pistorm MicroSD card, which was kindly sent to me as a thank you for my beta testing of AmiKit v12 earlier in the year. Thanks Jan! :-)
Next upgrade to put back in is the
ACE2 CHIP mem upgrade for the Amiga 500, which upgrades it to 2MB CHIP memory.
This requires me to remove the Gary chip, and put the connector to the ACE2 on the Gary chip socket, then put the Gary chip back on top.
Here that part if now installed on the Gary socket.
Here is the ACE2 other part, which has required me to remove the Agnus chip and replace it with the main ACE2 board, which has it's own newer Agnus chip on top.
I lastly add the DF0 selector hardware (bought from
Amigastore.eu) onto the CIA chip, allowing me to switch DF0 in hardware between the internal floppy drive and the external one.
In reality the external floppy drive is routed internally on the Checkmate 1500 plus to an internal gotek, which allows me to boot df0 from real floppy disks on the internal drive, or from ADF files on the gotek. Very convenient to have it all hosted within the Checkmate 1500 plus case. You can see this more later on.
With almost everything installed on the board, the next step is to remove it from the case.
I then got the checkmate 1500 plus case out of the cupboard where it has been neglected for the past 6 months, so it can be used again:
I removed and attached the Zorro board redirector and power module from the checkmate case and attached it to the Zorro slot on the left side of the A500 board. The reason for this is because it is not possible to connect it with the board fixed inside of the case.
I then mounted the Amiga 500 motherboard into the Checkmate 1500 plus case:
I still had the HDMI port and slot space for the VGA port for the Indivision ECS v3 to hooked into on the slot of the Checkmate 1500 plus, so I hooked those up next.
I then connected the external floppy connector to the internal gotek using my funky floppy cable, which uses an external floppy cable for an external drive (which was dead), which I route internally to connect to the gotek floppy cable :-)
I hide that under the floppy drive tray:
I plugged in the keyboard cables to the external port that connects to the Checkmate 1500 keyboard housing (which houses the original Amiga 500 keyboard in it).
It was around this point I remembered I hadn't upgraded the kickstart rom chip, which was still a Workbench v1.2 rom chip. I needed to remove the Pi briefly to get access to it, as it is underneath it.
I was going to swap the rom for a new 2023 AmigaOS 3.2.2 rom chip, which I had available to use, but I then noticed a problem - this Amiga 500 is one of the dreaded Revision 5 boards.
The problem with these Revision 5 boards is that they don't work with the later kickstart roms. At all.
There is fortunately a solution for this, via a rom chip adapter you can buy that uses a small converter board that you place on the kickstart socket, and then place the kickstart rom on top. I bought mine from
sordan.ie, and here it is:
I removed the kickstart 1.2 rom chip:
Here is the adapter with AmigaOS 3.2.2 kickstart rom chip now installed:
The extra height of the adapter unfortunately causes a small issue for the Pi, which is now too low to sit flat over the top of the kickstart chip.
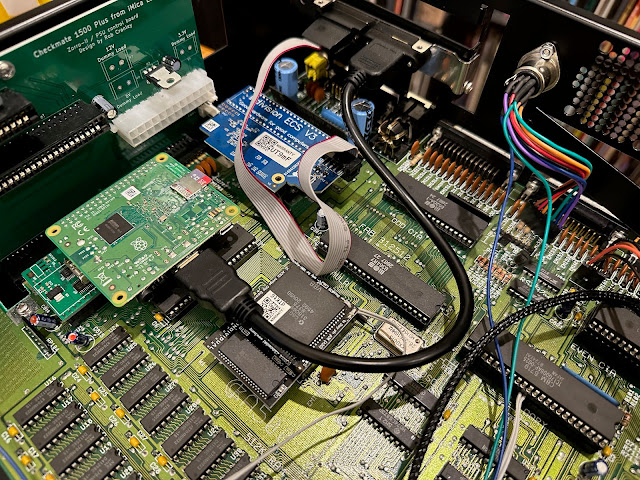
The HDMI cable does a great job of spacing the Pi from the kickstart rom chip, which while not looking great, works fine.
I then put the power cables into the zorro board plus power board module, which sits just above the Pi:
I also plan to try out getting my older Amiga 2000 A2091 SCSI card working with this setup too, given the checkmate 1500 plus case has a Zorro slot for such a purpose with a spare slot.
I turned off the memory on it using the onboard jumpers to avoid conflicts with the Pistorm. I plan to use it with my external SCSI CDROM drive.
I then installed it in the case:
Close up showing the external DB25 SCSI port of the A2091 card, with the HDMI output from the Pi, and the VGA scan doubled output from the native video using the Indivision ECS v3.
Before playing with the AmiKit Pistorm, I fired up the computer with the older Pistorm setup, since I know it was working, and sure enough, the system booted up first time and everything works - fantastic!
I used the space in front of the Amiga 1000 to setup initially, as it has more room in front. I needed a TFT screen with VGA and DVI inputs to feed both video outputs to the same screen. I then used a HDMI to DVI cable to connect the pi to it.
With that all working, I turned my attention to the newly released AmiKit 12 Pistorm, which came with a simple setup instruction sheet, and a container with a 64GB MicroSD card with the AmiKit 12 64GB Pistorm image pre-imaged on it:
There are a few steps to follow to get the system up and running, since the AmigaOS 3.2 roms, AmigaOS 3.2 software and some copyrighted software like Roadshow needs to be purchased separately and copied to the Boot partition on the MicroSD card. This can be read from your PC, Mac or linux box, so it is easy enough to copy the files needed.
The full hardware requirements and software needed list is here, taken from the AmiKit website:
I made sure to back up the MicroSD card image first using Win32diskimage on
my Alienware PC, so I had an image to go back to if I ran into problems (I didn't, but it is better to be safe as the software is not distributed digitally to download - you only get the MicroSD card physically sent to you).
As delivered, this AmiKit Pistorm was using the Emu68 v1 RC1 release. I later upgraded to the RC2 released in October 2023 with a number of fixes in it.
Once I put all the required AmigaOS 3.2.2 ADF disks, 3.2.2.1 hot fix update from Hyperion, Picasso96 v2 archive, and the whdload kickstart roms onto the correct folders on the Boot partition on the MicroSD card, I was ready to connect it to the Pi in my Pistorm setup!
At this point I swapped my 4:3 TFT screen with a more modern Acer 1080p screen (bought in 2017), so I can use the 1080p workbench supported by AmiKit Pistorm! As a side note, this is the same screen I used to use on the Amiga 1000 as it supported 15khz screen modes, meaning it doesn't need a scan doubler to work with the native Amiga video output - I covered more about this screen in my earlier
blog post here.
AmiKit Pistorm presents the same installation process screens as other AmiKit releases for Windows, Mac, Linux, Pi, etc. It is great to be able to run this on real Amiga systems finally.
Exciting isn't it?
The installation proceeds, copying across the needed files from the various adf and archives I placed on the Boot partition earlier:
The copy takes longer than it does when running AmiKit as an emulation on Mac or Windows, but that should be expected since it is using real Amiga hardware now.
The time needed gave me a chance to play around with some new Amiga games in 2023, starting with
Reshoot Proxima 3 on my Amiga 1200/030 system.
This is a great shoot em up, the graphics and music are wonderful, and definitely recommended. The move from horizontal to vertical really works for this game.
I also tried out the preview of
Dread, the amazing doom clone on my other Amiga 500 system. Doom on a stock Amiga 500 - who would have thought it would ever be possible, and yet here it is in 2023:
How amazing would this have been in 1994 to show Dread to the people who converted to PC that a Amiga 500 could do Doom after all!
I also tried out
Minky, a very pretty new platform game released for Amiga in 2023:
I also bought
Cyberpunks 2, which is a great new AGA game that is a sequel to the original Cyberpunks released by Core Design back in the last days before Commodore went bankrupt. I hadn't played the original game, and this is a lot of fun to play on my A1200.
The CD works on Amiga CD32, you can install to hard disk, and you can also play from floppy disks - the disk labels were included, so I wrote out the ADF images to disk to try out:
Reminds me of Chaos Engine, and I got a little engrossed in playing cyberpunks 2 for a while.
Lastly, I tried out
Roguecraft, a very cool upcoming game for the Amiga, based on the original Rogue 64 game for the C64 (which I also bought a few years back when it was originally released).
This game is quite the looker, it's a nice isometric 3d adventure game, and I look forward to playing the final game when it is released in early 2024!
There are also ports of other platform games available for Amiga in 2023 too - Xevious 1200, Supercars II AGA, Ooze, Death rally, and many more. So exciting to have these new games for Amiga in 2023!
Anyway, distractions need to end as the AmiKit Pistorm installation has completed successfully, and is ready to choose a screen mode:
Naturally I want to use 1080p workbench screen:
I tested it first to make sure it worked. 1080p HDMI output on my Amiga 500. Love it:
With that done, the initial installation process is completed, ready for reboot:
Now at this point it reminds me to select the network drivers for internet access, needed to download updates and register this installation.
Now this presents another problem - I need a network card. I expect most people will use an Amiga 1200 with Pistorm32 lite card to run this. I am not, because I have one Amiga 1200 with 030 for demos, and the other runs Vampire 2 accelerator.
My Amiga 2000 already is well upgraded and I don't want to run Pistorm on it.
The A500 doesn't have any network connectivity (although I supposed I could connect a A2065 ethernet card instead of the SCSI card), and no PCMCIA port to connect a wireless card.
For this situation, I have the rather excellent Plipbox ethernet solution, which is a hardware solution that connects to the Amiga parallel port and gives you a RJ45 network card port to connect to the outside world.
I then connected a MicroUSB cable to power the Plipbox, as there is not enough power to power it from the internal port alone.
Here it is connected to the Amiga 500 in the Checkmate 1500 plus case:
With that done, I could power up the Amiga 500 again, and proceed with the network setup of the AmiKit 12 Pistorm, which comes up straight away on the first boot after the installation completed.
I stepped through the wizard to configure the network using the Plipbox - I selected the LAN card and then the Plipbox. Sorry for the crappy iPhone screen photos but it was all I had time for:
I skipped the additional settings:
I disabled the burst mode, as suggested as the default.
A message warning about the plipbox not working sometimes is a good warning - in my experience soft resets mean the plipbox doesn't work on the reboot. Power off/on is needed.
I selected to use internet time to sync the time for this Amiga, since I have no RTC on the Amiga 500.
I then selected English as the language, keyboard setup, selected my country, timezones, etc:
I elected to reboot at this point - I purchased my copy of Roadshow, so no time limitations for me.
On bootup, this Emu68 Pistorm logo appears, which is quite cool. Version info is shown in the bottom right corner. As mentioned it is running v1 RC1 firmware initially - I upgraded it to RC2 later.
After booting into AmiKit Pistorm, the updates screen appears, allowing me to enter my purchase ID and email information to activate my copy of AmiKit 12 Pistorm and apply the latest updates, which require a paid subscription.
There is already an 12.3 update to deploy, so I went ahead and applied it:
If the download fails, the update fails and you can simply download it again.
On the Plipbox I found I needed to do it twice before the update downloaded successfully. This mirrors similar experience for AmiKit on Windows, Mac, Linux if there is a lot of network activity when the download occurs.
With the 12.3 update applied, the system boots up into the full AmiKit 12 Pistorm environment. It looks sensational:
Having a 1080p true colour RTG workbench screen on my Amiga 500 is awesome:
If you have used AmiKit XE 12 on Windows, linux or Mac, then most things work the same on the real Amiga hardware, with the exception of Rabbit Hole, which works a little differently.
Time to enjoy some of the included music modules in Eagleplayer - yes I think so:
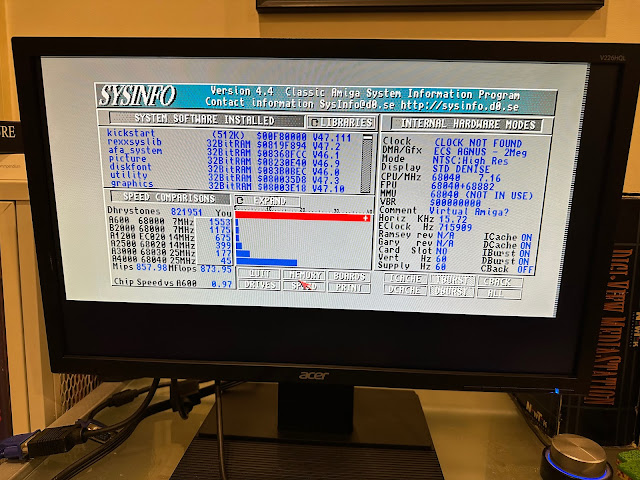
For those who care about such things, here is the obligatory SysInfo benchmark performance screen - needless to say with the Pistorm, system performance is incredible:
Checking the devices, I can see the system sees the A2091 scsi card, which is promising:
Kinda funny to see Zorro III devices on a Amiga that never supported Zorro III originally...2023 removes the boundaries!
Interestingly, the Pistorm setup uses brcm-sdh.device instead of the usual scsi.device for the boot disk in the Pi. This probably explains why the A2091 card is working since it uses the usual scsi.device.
Looking at the memory in the system, I have 236MB FAST memory (Zorro III I guess), and an extra 112MB fast memory (Zorro II I presume) installed via the Pi. 348MB fast memory - nice!
The ACE2 hardware upgrade gives me the 2MB chip memory, as shown in SysInfo below:
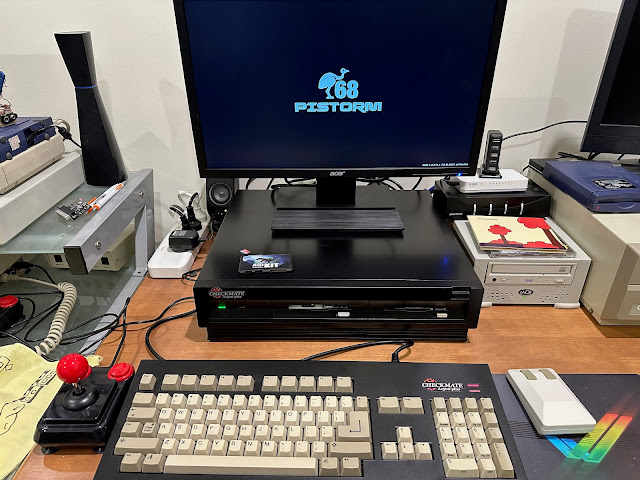
This is one seriously upgraded Amiga 500! I moved it into its new home next to my Amiga 2000. I moved the Amiga 4000D that was there - not sure where it will go yet. Once problem at a time.
I put it here because I have an external SCSI CDROM drive (normally connected to the A2000), that I wanted to test connecting to the A2091 card on the Pistorm.
I connected my new joystick, and wireless Tank Mouse to the system also. With that done, the AmiKit Pistorm setup is now looking very nice indeed:
With the joystick hooked up, time to try some games included with the AmiKit 12 Pistorm, starting with Open Tyrian - which works brilliantly:
I should caution people that Pistorm is still beta, and there is a lot of development still ongoing to improve its compatibility with original Amiga games and demos. I found in testing a number of demos ran too fast or glitchy, similar to what I found last time I tested a Pistorm setup.
This is not the fault of AmiKit Pistorm, but a limitation of the Emu68 firmware compatibility.
Some old WHDLoad based games and demos work perfectly, but many don't. Modern games and applications work very well so far in my limited testing.
To be honest, I think the Vampire v2 compatibility is much better than Pistorm, but then again, Vampire is a lot more expensive than the Pistorm solution.
The makers of Vampire have gone its own way with ApolloOS based on AROS kickstart rom to avoid copyright issues, rather than the latest AmigaOS 3.2.2 setup.
I still use the CoffinOS setup on my Vampired Amiga 1200 since it uses AmigaOS 3.9 and is much more compatible.
So, let the buyer beware. These systems are faster, but there is a price to pay for it.
With the extra speed opens up new games to play on Amiga, including Diablo! I never thought I would ever be able to play this PC game on the Amiga, but here it is, included with AmiKit 12 Pistorm:
My late father loved this game and played it to the end, and also finished Diablo II and III. Sad he never got to try the recently released Diablo IV - I think he would have loved it. Anyway, definite memories for me reliving this game, and glad to do it on the Amiga 500 for the first time!
You can also playback videos, and use AmiFox to browse the internet:
As mentioned earlier, I then took out the MicroSD card from the Pi in the Amiga 500, put it in my Alienware PC to download and then transfer the updated RC2 files from emu68 GitHub to the boot partition on the MicroSD.
Important not to replace the config.txt file used by AmiKit 12 Pistorm while doing this. You can see the updated RC2 version now in place on the Amiga 500 once I put the updated MicroSD back in - bottom right corner:
I also copied all my whdload games, demos, modules and more on the Alienware PC while I was updating the firmware files on the MicroSD. There is a 10GB FAT partition on the MicroSD for this, which is readable on the Amiga as well.
Once put back into the Checkmate 1500 system, I then started the long job of transferring my whdload games, demos, modules, and more from the FAT partition to the Stuff partition, which has plenty of space (32GB) for files.
That done, I could then set one of favourite backgrounds for the workbench, which nicely personalises my AmiKit 12 Pistorm setup.
There is more still to do - I want to get some demos from the Vampire CF card onto this system, since they use RTG and should work on this system too - I also want to put some CD based games on here, which I need to get working also.
I have also kickstarter backed a black
Checkmate monitor which I might use with this case when it comes in 2024 - or maybe the CDTV....decisions, decisions.
But this is for another day and another blog entry. For now, I am happy my AmiKit 12 Pistorm is up and running, and with it transforming my Amiga 500 into a system I never thought it could ever be.


Great system. Thanks for the review :)
ReplyDeletewow, thats one Dream Amiga! I was one of those that betrayed Commodore back in 1990 - going from C64 to 286 AT - parents doing...thanks for nostalgia and gongrats to Your deep Commodore suppoirt CHEERS
ReplyDelete